
Display Driver Uninstaller Free Activate - delirium
DDU (Display Driver Uninstaller) v18.0.0.4
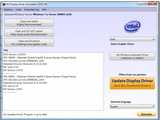
Display Driver Uninstaller is a neat tool used to completely uninstall NVIDIA, AMD and Intel display drivers.
It accomplishes this task in only a few clicks. Sometimes it may be necessary to completely remove the display driver installed in Windows and install a clean, new version of the drivers. This tool makes the first part of the process as easy as a few clicks of the mouse.
For discussion on this tool, see this thread.
Suggest corrections
Screenshots:
HTML code for linking to this page:
Keywords:
display driver uninstaller nvidia amd intel drivers
License typeFreeware1
Author's homepageVisit the author's site
Date added29 Jul 2020
Downloads3,053
File size 1.26 MB (<1min @ 1Mbps)
Supported languages English
Operating systemsVista / Win10 / Win7 / Win8 / WinXP1
1License and operating system information is based on latest version of the software.
Display Driver Uninstaller 18.0.5.5 (DDU)
Free download Display Driver Uninstaller 18.0.5.5 (DDU) full version standalone offline installer for Windows PC,
Display Driver Uninstaller Overview
Usually, the AMD/NVIDIA video drivers from the Windows Control panel can usually uninstall. The Display Driver Uninstaller (DDU) 18 program was designed to be used in cases where the standard driver uninstalls fails, or anyway when you need to delete NVIDIA and ATI video card drivers thoroughly.
After using this driver removal tool, the current effect will be similar to the first time you install a new driver, just like a fresh, clean install of Windows. As with any tool of this kind, we recommend creating a new system restore point before using it so that you can revert your system at any time if you run into problems.
If you have a problem installing an older driver or newer one, give it a try as there are some reports that it fixes those problems. DDU is an application programmed by Ghislain Harvey, aka Wagnard; in our forums, Guru3D.com is the official download partner for this handy application.
System Requirements and Technical Details
Supported OS: Windows 11, Windows 10, Windows 8.1, Windows 7
RAM (Memory): 2 GB RAM (4 GB recommended)
Free Hard Disk Space: 200 MB or more
,Program download Display Driver Uninstaller, Download Display Driver Uninstaller, Download Display Driver Uninstaller, Program Display Driver Uninstaller, Display Driver Uninstaller Full activated, crack program Display Driver Uninstaller, program explanation Display Driver Uninstaller
On Windows 10, you can always use the manufacturer uninstaller and Device Manager to uninstall graphics drivers. However, sometimes the process won’t complete successfully, or it’ll remove the packages, leaving behind leftovers that may cause problems when installing new drivers, and this is when “Display Driver Uninstaller” (DDU) comes in handy.
“Display Driver Uninstaller” is a tool that uninstalls AMD and Nvidia graphics drivers completely without leaving behind any registry keys, files, folders, or driver store when the uninstall fails, or you need to delete the graphics card driver completely.
In this guide, you will learn the steps to use the Display Driver Uninstaller tool to delete Nvidia and AMD graphics drivers from Windows 10.
Warning: This is a third-party application offered “as-is.” Use it at your own risk. Before continuing, creating a full backup is highly recommended to revert the changes if something wrong happens. In addition, it’s recommended to disconnect your computer from the internet until you reinstall the display driver.
Uninstall Nvidia and AMD graphics with Display Driver Uninstaller
To use the Display Driver Uninstaller to completely remove the graphics driver on Windows 10, use these steps:
Open the guru3d website.
Under the “Download Locations” section, click the Display Driver Uninstaller download link nearest to your location to save the file.

Double-click the zip folder.
Click the Extract all button from the “Compressed Folder Tools” ribbon.
Click the Extract button.

Double-click the DDUvxx.x.x.x.exe file.
Click the Extract button.

Save your work and close any running applications.
Open Start.
Press and hold the Shift key, click the Power button, and select the Restart option to launch the Advanced startup experience to access Safe mode.
Click the Troubleshoot button.
Click on Advanced Options.
Click on Startup Settings.
Click the Restart button.

Select the Enable Safe Mode option (F4).
Open the “DDU vxx.x.x.x.exe” folder with the extracted files.
Double-click the Display Driver Uninstaller.exe file.
Select the settings to use to remove Nvidia or AMD drivers on Windows 10. (The default settings should work in most cases unless you know what you’re doing.)

Select the Nvidia or AMD graphics card using the drop-down menu on the right side.
Click the Clean and restart button.

Once you complete the steps, the tool will thoroughly delete the current Nvidia or AMD driver, and the computer will restart automatically. After the restart, you can reinstall the new graphic driver on Windows 10.
While these instructions will help you to completely remove the graphics driver from your device, according to the author of the software, you should only use this tool when having a problem uninstalling or installing a driver or when switching GPU brands. And you shouldn’t use it every time you need to update the driver.
If you’re having issues with the Display Driver Uninstaller software, you should check the guru3d website for more details and help.
We may earn commission for purchases using our links to help keep offering the free content. Privacy policy info.
All content on this site is provided with no warranties, express or implied. Use any information at your own risk. Always backup of your device and files before making any changes. Privacy policy info.
Revo Uninstaller Free 2.3.8

Free
| Price | Free |
| Version | 2.3.8 |
| Release Date | May 3, 2022 |
| Operating Systems | Windows XP, Windows Vista, Windows 7, Windows 8, Windows 8.1, Windows 10, Windows 11, Windows Server |
| Publisher | VS Revo Group - http://www.revouninstaller.com - Bulgaria |
| Publisher's Description | |
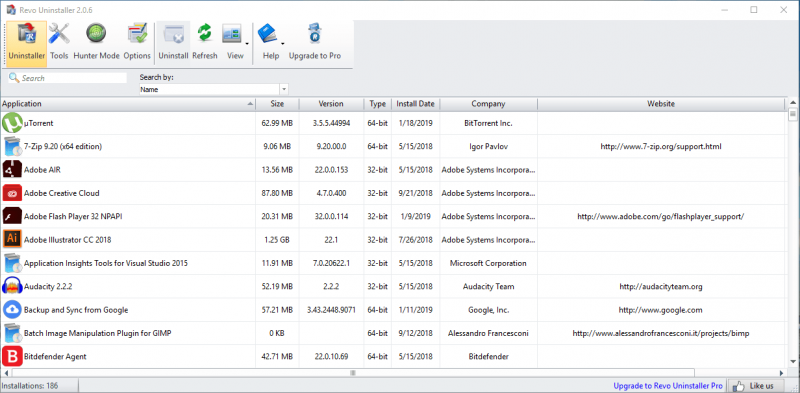
Revo Uninstaller helps you to uninstall software and remove unwanted programs installed on your computer easily! Even if you have problems uninstalling and cannot uninstall them from "Windows Programs and Features (Add or Remove Programs)" control panel applet.
Uninstaller
The Uninstaller module is Revo Uninstaller ‘s primary feature for situations when a program won’t uninstall normally or when you have some doubts that a program has not been uninstalled completely.
Also when a program is uninstalled, often times there are multiple files, folders, and/or Registry entries left on your system, which can cause various issues if not removed. This happens more frequently than you might think.
Revo Uninstaller acts as both a replacement and a supplement to the built-in functionality in Windows by first running the built-in uninstaller for the program, and then scanning for leftover data afterwards, making it your best choice when it comes to completely remove stubborn programs, temporary files, and other unnecessary program data that is left behind after the standard uninstall process.
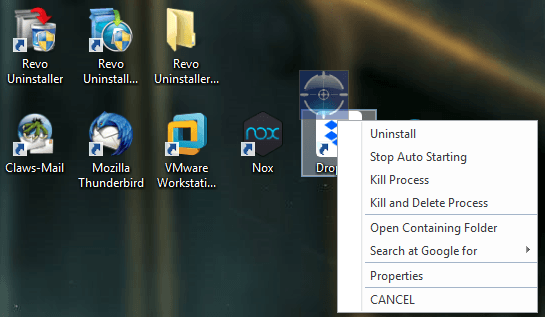
Hunter Mode
Hunter Mode is an innovative feature that allows you to select in a more flexible way the program to uninstall or manage. When you activate Hunter Mode, Revo Uninstaller ‘s main window will disappear, and a new targeting icon will appear instead. Simply drag and drop that icon over the opened window, System Tray icon, or Desktop icon of the program you wish to control, and Revo Uninstaller will display any available options in a convenient menu. This can be very useful because many programs loading on start-up and/or remain in the system tray without your consent, or you do not even know which program that is.
The Hunter Mode can come in handy when you want to uninstall an unknown program (or at the very least disable its automatic start-up in Windows), which you cannot find listed anywhere, but you can see its window or icon.


Display Driver Uninstaller 18.0.4.1 With Crack Latest
Display Driver Uninstaller is a driver removal utility that can help you completely uninstall AMD/NVIDIA graphics card drivers and packages from your system, without leaving leftovers behind (including registry keys, folders and files, driver store).
The AMD/NVIDIA video drivers can normally be uninstalled from the Windows Control panel, this driver uninstaller program was designed to be used in cases where the standard driver uninstall fails, or anyway when you need to thoroughly delete NVIDIA and ATI video card drivers.
This utility which will allow you to completely remove the drivers for NVIDIA and AMD graphics cards, will also remove the registry keys, all files and folders, you can download Display Driver Uninstaller below.
If you do not want to remove the driver from the standard Windows method, you worry that after such a cleanup there will be traces, and most likely it will be, you just need to use this portable utility.
If you experience, then do not forget to create a system restore point.
Developer : Wagnard
License : FreeWare
Language : Multi + Russian
Size : 1 MB
OS : Windows
You can download Form Display Driver Uninstaller from the link below…
Download Links
When your camera isn't working in Windows 11, it might be missing drivers after a recent update. It's also possible that your antivirus program is blocking the camera, your privacy settings don't allow camera access for some apps, or there's a problem with the app you want to use.
Before you begin
Start by running the automated camera troubleshooter in the Get Help app. Get Help automatically runs diagnostics and takes the correct steps to fix most camera issues.
Open Get Help
If the Get Help app is unable to resolve your camera issue, do these steps first before working through the possible solutions listed:
Check for updates. Select Start > Settings > Windows Update > Check for updates.
If there are no updates for your camera, try to select Advanced options > Optional updates, and look for any driver updates for your camera. Allow available updates to install, then restart your device when it's ready.
Restart your PC. If you haven't restarted your device since the camera stopped working, you should do so. Select Start > Power > Restart . Waking up your device from sleep isn't the same thing as a restart.
Test your camera with the Camera app. Select Start , then choose Camera from your apps. If you're asked to allow access to the Camera, select Yes. If the camera works in the Camera app, the problem might be with the app you're trying to use.
Open Camera
If your camera still doesn’t work, here are some other things to try. For the best results, try the possible fixes in the order presented.
Check for a camera switch or button on your device
Some laptops and portable devices have a physical switch or button that turns the camera on or off. When it's turned off, your device may not recognize that there's a camera installed, or it may cause your camera to show an image of a camera with a slash through it. If your laptop has a switch or button, make sure it's in the on position before using your camera.
Those switches or buttons may not be easy to find, so make sure you check all possible places. For example, it could be:
A button on the keyboard that's activated with the Fn key
A dedicated camera button on the keyboard
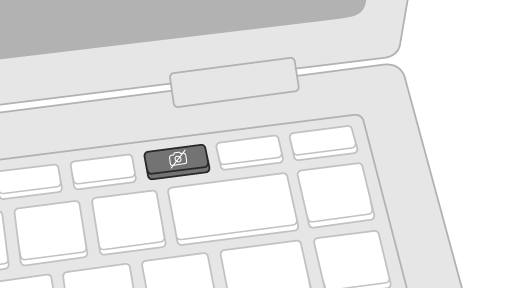
A sliding switch on the side of a laptop
A small slider for a shutter, built right into the camera

Check your settings
Give your apps permission
If you recently updated Windows 11, you might need to give apps permission to use the camera. In newer versions of Windows 11, some apps won't have default access to the camera.
Here's how to let your apps access the camera:
Select Start > Settings > Privacy & security > Camera .
Allow access to the camera on this deviceMake sure Camera access is turned on.
Note: If camera access for the device is turned off and greyed out, you'll need an administrator on the device to turn on camera access for you.
Make sure Let apps access your camera is turned on.
Choose which apps should have access. Only apps that were installed from the Microsoft Store will appear in this list.
If you're having problems with an app that you did not install from Microsoft Store, make sure that Let desktop apps access your camera is turned on. You can't turn off camera access for individual desktop apps. Internet browsers, like Microsoft Edge, and many video conferencing apps, like Microsoft Teams, are desktop apps that require this setting to be turned on.
Check your antivirus software
In your antivirus software settings, look for settings that block access to your camera or permission to use your camera. For help, visit your antivirus software company’s website.
Check your hardware drivers
Try a different USB port and scan for hardware changes
If you're using an external camera, try using it with a different USB port on your device first. If that doesn't work, or your camera is built in on your device, try this:
Select Start , type device manager, then select it from the search results.
Find your camera under Cameras, Imaging devices, or Sound, video and game controllers.
If you can't find your camera, select the Action menu, then select Scan for hardware changes.
Wait for it to scan and reinstall updated drivers, restart your device, then open the Camera app again to test it.
If these steps don't fix your issue, continue to the next steps.
Roll back the camera driver
If your camera stopped working after an update, try these steps:
In Device Manager, right-click (or press and hold) on your camera, then select Properties.
Select the Driver tab, select Roll Back Driver, and then choose Yes. (Some drivers don’t provide this option. If your driver doesn’t have Roll Back Driver available, go ahead to the next fix.)
After the roll back is complete, restart your device, and then try opening the Camera app again.
If rolling back didn’t work or isn’t available, continue to the next steps.
Uninstall your camera driver and scan for hardware changes
In Device Manager, right-click (or press and hold) on your camera, and then select Properties.
Select the Driver tab, then select Uninstall Device. Select the check box for Attempt to remove the driver for this device, then select OK.
In Device Manager, on the Action menu, select Scan for hardware changes.
Wait for it to scan and reinstall updated drivers, restart your PC, and then try opening the Camera app again.
Note: If your camera still doesn’t work, look for help on the camera manufacturer’s website.
Switch to UVC driver
Most available USB webcams are UVC (standard USB Video Class) compatible cameras. They will work with the UVC driver that is included in Windows (the in-box UVC driver). If your webcam is not working correctly, swapping to the in-box UVC driver may resolve the issue. Please follow the steps below to change drivers (admin rights are required).
Note: The in-box UVC driver may not support all the features of your camera. For example, Windows Hello face recognition may no longer work if it was supported by the camera manufacturer's driver using custom USB extensions not supported by the in-box driver.
Select Start , type device manager, then select it from the search results.
Find the problem webcam from the list of devices shown in the Device Manager. It should appear either under Cameras or Imaging devices.
Right-click the webcam device and select Update driver.
Select Browse my computer for drivers.
Select Let me pick from a list of available drivers on my computer.
Select USB Video Device and then select Next to complete the driver update.
Select Close to acknowledge settings choices and go back to Device Manager. The webcam will now appear under the Cameras category in the Device Manager list.
Need more help?
If you'd like to learn about the basics of using the camera, see How to use the Camera app.
Find answers in the forums
If the previous solutions didn't work, try searching for similar problems in the Microsoft Community forum and search for Camera. If you don’t find a solution, go ahead and share details about your experience there, then check back later for responses.
Submit feedback
If you've tried the steps in this article and don't find a solution that works, use Windows Feedback Hub to report an issue. This will help Microsoft find the cause of this problem and improve your experience.
Include details about what you were doing, or specific steps you were taking, when the problem occurred. Be sure to use Recreate my problem when you submit your feedback in the Feedback Hub.
Open the Feedback Hub
Related topics
When your camera isn't working in Windows 10, it might be missing drivers after a recent update. It's also possible that your antivirus program is blocking the camera, your privacy settings don't allow camera access for some apps, or there's a problem with the app you want to use.
Before you begin
Start by running the automated camera troubleshooter in the Get Help app. Get Help automatically runs diagnostics and takes the correct steps to fix most camera issues.
Open Get Help
If the Get Help app is unable to resolve your camera issue, do these steps first before working through the possible solutions listed:
Check for updates. Select Start , then select Settings > Update & Security > Windows Update > Check for updates. If you see the option to View optional updates, select it to see if there are updates available for your camera. Allow available updates to install, then restart your device when it's ready.
Restart your PC. If you haven't restarted your device since the camera stopped working, you should do so. Select Start , then select Power > Restart. Waking up your device from sleep isn't the same thing as a restart.
Test your camera with the Camera app. Select Start , then choose Camera from the list of apps. If you're asked to allow access to the Camera, select Yes. If the camera works in the Camera app, the problem might be with the app you're trying to use.
Open Camera
If your camera still doesn’t work, here are some other things to try. For best results, try the possible fixes in the order presented.
Check for a camera switch or button on your device
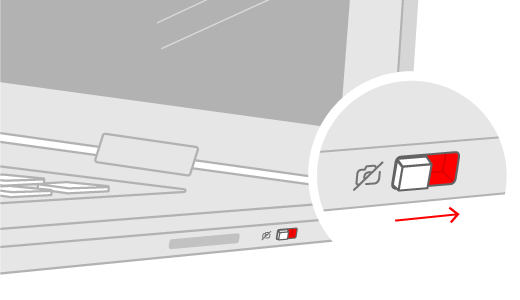
Some laptops and portable devices have a physical switch or button that turns the camera on or off. When turned off, your device won't recognize that there's a camera installed, or may cause your camera to show an image of a camera with a slash through it. If your computer has a switch or button, make sure it's in the on position before using your camera.
Those switches or buttons may not be easy to find, so make sure you check all possible places. For example, it could be:
A sliding switch on the side of a laptop
A button on a keyboard with a camera icon
A small slider for a shutter, built right into the camera
Check your settings
Give your apps permission
If you recently updated Windows 10, you might need to give apps permission to use the camera. In newer versions of Windows 10, some apps don’t have default access to the camera.
To let your device access the camera, select Start , then select Settings > Privacy > Camera . In Allow access to the camera on this device, if Camera access for this device is turned off, select Change and turn on Camera access for this device.
Allow access to the camera on this device
Note: If camera access for the device is turned off and you can't select Change, you'll need an administrator on the device to turn on camera access for you.
Before any app can access your camera, make sure camera access is turned on for apps in your user account. Make sure that Allow apps to access your camera is turned on.
After allowing access to the camera, go to Choose which Microsoft Store apps can access your camera and turn on camera access for the apps you want. Only apps installed from the Microsoft Store will show in this list.
If you installed the app from the internet, a disc, a USB drive, or your IT administrator installed the app for you, it might not be a Microsoft Store app. To check, go to Allow desktop apps to access your camera and make sure it's turned on. Internet browsers (like Microsoft Edge) and many video conferencing apps (like Microsoft Teams) are desktop apps that require this setting to be turned on.
Check your antivirus software
In your antivirus software settings, look for settings that block access to your camera or permission to use your camera. For help, visit your antivirus software company’s website.
Check your hardware drivers
Try a different USB port and scan for hardware changes
If you're using an external camera, try using it with a different USB port on your device first. If that doesn't work, or your camera is built in on your device, try this:
In Search on the taskbar, type device manager, then select it from the search results.
Find your camera under Cameras, Imaging devices, or Sound, video and game controllers.
If you can't find your camera, select the Action menu, then select Scan for hardware changes.
Wait for it to scan and reinstall updated drivers, restart your device, then try opening the Camera app again.
If these steps don't fix your issue, continue to the next steps.
Check for an incompatible camera driver
Some older cameras that were designed for older devices aren't compatible with Windows 10. Here's how to check if your camera is compatible:
In Device Manager, look for your camera under Cameras, Imaging devices, or Sound, video and game controllers.
Right-click (or press and hold) on the name of your camera, and then select Properties.
Select the Driver tab, select the Driver Details button, and look for a file name that includes stream.sys. If it’s there, your camera was designed before Windows 7 and you'll have to replace it with a newer camera.
If you don't find a file name that includes stream.sys, continue to the next steps.
Roll back the camera driver
If your camera stopped working after an update, try these steps:
In Device Manager, right-click (or press and hold) on your camera, and then select Properties.
Select the Driver tab, select Roll Back Driver, and then choose Yes. (Some drivers don’t provide this option. If your driver doesn’t have Roll Back Driver available, go ahead to the next fix.)
After the roll back is complete, restart your device, and then try opening the Camera app again.
If rolling back didn’t work or isn’t available, continue to the next steps.
Uninstall your camera driver and scan for hardware changes
In Device Manager, right-click (or press and hold) on your camera, and then select Properties.
Select the Driver tab, then select Uninstall Device. Select the check box for Deletethe driver software for this device, then select OK.
In Device Manager, on the Action menu, select Scan for hardware changes.
Wait for it to scan and reinstall updated drivers, restart your PC, and then try opening the Camera app again.
Note: If your camera still doesn’t work, look for help on the camera manufacturer’s website.
Switch to UVC driver
Most available USB webcams are UVC (standard USB Video Class) compatible cameras. They will work with the UVC driver that is included in Windows (the in-box UVC driver). If your webcam is not working correctly, swapping to the in-box UVC driver may resolve the issue. Please follow the steps below to change drivers (admin rights are required).
Note: The in-box UVC driver may not support all the features of your camera. For example, Windows Hello face recognition may no longer work if it was supported by the camera manufacturer's driver using custom USB extensions not supported by the in-box driver.
In Search on the taskbar, type device manager, then select it from the search results.
Find the problem webcam from the list of devices shown in the Device Manager. It should appear either under Cameras or Imaging devices.
Right-click the webcam device with your mouse and select Update driver.
Select Browse my computer for drivers.
Select Let me pick from a list of available drivers on my computer.
Select USB Video Device and then select Next to complete the driver update.
Select Close to acknowledge settings choices and go back to Device Manager. The webcam will now appear under the Cameras category in the Device Manager list.
Need more help?
If you'd like to learn about the basics of using the camera, see How to use the Camera app.
Find answers in the forums
If the previous solutions don’t work, try searching for similar problems in the Microsoft Community forum and search for Camera. If you don’t find a solution, go ahead and share details about your experience there, then check back later for responses.
Submit feedback
If you've tried the steps in this article and don't find a solution that works, use Windows Feedback Hub to file a bug. This helps Microsoft find the root cause of this problem.
Include details about what you were doing, or specific steps you were taking, when the problem occurred. Be sure to use Recreate my problem when you submit your feedback in the Feedback Hub.
Open the Feedback Hub
For help submitting feedback with Feedback Hub, see Send feedback to Microsoft with the Feedback Hub app.
Related topics
Display Driver Uninstaller – DDU for Windows x32-x64
Display Driver Uninstaller:
The Display Driver Uninstaller is a useful tool that can prevent the installation of outdated or faulty drivers. The DDU application is free and can be downloaded from the DDU website. You must make sure that the file is located on the local disk. To install DDU, you must first enable the program in safe mode. Once you’ve done this, run the DDU application from the DDU website and follow the steps on the screen.
Instructions to run Display Driver Uninstaller (DDU):
To run the application, you need to start it in Safe Mode. By launching the software in this mode, you can minimize potential problems on your PC. The Safe Mode is optional. Click OK to continue. You can also select the Options menu and then open the Enable Safe-Mode dialog. After the installation is complete, you can close the DDU application and launch the program again. If you choose to run the program in Safe Mode, the DDU will launch in the Safe Mode.
The installation process for Display Driver Uninstaller – DDU:
After installing the software, you can start it from Safe Mode. Then, click on the Start button and click on Control Panel. Type “DDU” into the Search Bar and press Enter. After the application installs, you can go to the Windows XP Control Panel by typing it in the Search Bar. Then, double-click on the program to run it. Then, follow the prompts to activate the program.
Program running Process:
The DDU will prompt you to run the program in Safe Mode. This option is optional. You can select the Options tab in the Enable Safe Mode dialog and click OK. After the installation of Display Driver Uninstaller – DDU, choose Safe Mode and reboot your PC. It’s a good idea to download a new driver before running the program in Safe Mode. Then, launch Windows again in Normal Mode and wait for the results.
Once you have installed the DDU, you need to launch it in Safe Mode. Then, you should click on the Options tab in the DDU program. This will bring up the Settings tab, which contains a series of options. In this window, you will see a list of the display driver uninstallation options. These options are mostly for power users, as you can always change the settings later if something goes wrong.
The different methods to run the Program:
The DDU software comes in a 7zip file. Using it in Safe Mode will help you to prevent any unforeseen issues while reinstalling the drivers. If you don’t want to run the program in Safe Mode, you can select the option in the Options window and press OK. Then, you should select “Safe Mode” and click the Start button. When the DDU prompt is complete, your PC will boot in the Safe Mode.
Removing the Display driver using DDU:
To remove the display driver, you must first enable Safe Mode. To do this, click the “Launch” button to launch the app. Then, double-click the “Launch” button to begin the uninstallation process. Once the DDU installer is loaded in the Safe Mode, you will be prompted to restart the PC. This will allow the DDU to do its job without affecting your computer’s performance.
After the complete installation of Display Driver Uninstaller:
After installing DDU, launch the program in Safe Mode. The DDU application will prompt you to run it in this mode. This is a precautionary measure that will prevent potential problems. By using Safe Mode, you can safely uninstall AMD/NVIDIA graphics card drivers. In addition to removing outdated drivers, DDU also allows you to remove packages, registry keys, folders, and files. You can even disable the display driver on the driver store by clicking on the “Safe Mode” button in the Options window.
If you are not using Safe Mode, start the program by double-clicking the “Safe Mode” button in the program’s options menu. Then, you should choose a language for the installation. If you are using a different language, choose “Use the DDU version that supports it. By default, the language is English. You should use the same settings for the application in your native language.
Related Videos
How to Install and Use Display Driver UninstallerRevo Uninstaller Free 2.3.8
Free
| Price | Free |
| Version | 2.3.8 |
| Release Date | May 3, 2022 |
| Operating Systems | Windows XP, Windows Vista, Windows 7, Windows 8, Windows 8.1, Windows 10, Windows 11, Windows Server |
| Publisher | VS Revo Group - http://www.revouninstaller.com - Bulgaria |
| Publisher's Description | |
Revo Uninstaller helps you to uninstall software and remove unwanted programs installed on your computer easily! Even if you have problems uninstalling and cannot uninstall them from "Windows Programs and Features (Add or Remove Programs)" control panel applet.
Uninstaller
The Uninstaller module is Revo Uninstaller ‘s primary feature for situations when a program won’t uninstall normally or when you have some doubts that a program has not been uninstalled completely.
Also when a program is uninstalled, often times there are multiple files, folders, and/or Registry entries left on your system, which can cause various issues if not removed. This happens more frequently than you might think.
Revo Uninstaller acts as both a replacement and a supplement to the built-in functionality in Windows by first running the built-in uninstaller for the program, and then scanning for leftover data afterwards, making it your best choice when it comes to completely remove stubborn programs, temporary files, and other unnecessary program data that is left behind after the standard uninstall process.
Hunter Mode
Hunter Mode is an innovative feature that allows you to select in a more flexible way the program to uninstall or manage. When you activate Hunter Mode, Revo Uninstaller ‘s main window will disappear, and malwarebytes free new targeting icon will appear instead. Simply drag and drop that icon over the opened window, System Tray icon, or Desktop icon of the program you wish to control, and Revo Uninstaller will display any available options in a convenient menu. This can be very useful because many programs loading on start-up and/or remain in the system tray without your consent, or you do not even know which program Display Driver Uninstaller Free Activate is.
The Hunter Mode can come in handy when you want to uninstall an unknown program (or at the very least disable its automatic start-up in Windows), which you cannot find listed anywhere, but you can see its window or icon.
Display Driver Uninstaller 18.0.5.5 (DDU)
Free download Display Driver Uninstaller 18.0.5.5 (DDU) full version standalone offline installer for Windows PC,
Display Driver Uninstaller Overview
Usually, the AMD/NVIDIA video drivers from the Windows Control panel can usually uninstall. The Display Driver Uninstaller (DDU) 18 program was designed to be used in cases where the standard driver uninstalls fails, Display Driver Uninstaller Free Activate, or anyway when you need to delete NVIDIA and ATI video card drivers thoroughly.
After using this driver removal tool, the current effect will be similar to the first time you install a new driver, just like a fresh, clean install of Windows. As with any tool of this kind, we recommend creating a new system restore point before using it so that you can revert your system at any time if you run into problems.
If you have a problem installing an older driver or newer one, give it a try as there are some reports that it fixes those problems. DDU is an application programmed by Ghislain Harvey, aka Wagnard; in our forums, Guru3D.com is the official download partner for this handy application.
System Requirements and Technical Details
Supported OS: Windows 11, Windows 10, Windows 8.1, Windows 7
RAM (Memory): 2 GB RAM (4 GB recommended)
Free Hard Disk Space: 200 MB or more
,Program download Display Driver Uninstaller, Download Display Driver Uninstaller, Download Display Driver Uninstaller, Program Display Driver Uninstaller, Display Driver Uninstaller Full activated, Display Driver Uninstaller Free Activate, crack program Display Driver Uninstaller, program explanation Display Display Driver Uninstaller Free Activate Uninstaller
crack software download pc height="405">
Display Driver Uninstaller 18.0.4.1 With Crack Latest
Display Driver Uninstaller is a driver removal utility that can help you completely uninstall AMD/NVIDIA graphics card drivers and packages from your system, without leaving leftovers behind (including registry keys, folders and files, driver store).
The AMD/NVIDIA video drivers can normally be uninstalled from the Windows Control panel, this driver uninstaller program was designed to be used in cases where the standard driver uninstall fails, Display Driver Uninstaller Free Activate, or anyway when you need to thoroughly delete NVIDIA and ATI video card drivers.
This utility which will allow you to completely remove the drivers for NVIDIA and AMD graphics cards, will also remove the registry keys, all files and folders, you can download Display Driver Uninstaller below.
If you do not want to remove the driver from the standard Windows method, you worry that after such a cleanup there will be traces, and most likely it will be, you just need to use this portable utility.
If you experience, then do not forget to create a system restore point.
Developer : Wagnard
License : FreeWare
Language : Multi + Russian
Size : 1 MB
OS : Windows
You can download Form Display Driver Uninstaller from the link below…
Download Links
When your camera isn't working in Windows 11, it might be missing drivers after a recent update. It's also possible that your antivirus program is blocking the camera, your privacy settings don't allow camera access for some apps, or there's a problem with the app you want to use.
Before you begin
Start by running the automated camera troubleshooter in the Get Help app. Get Help automatically runs diagnostics and takes the correct steps to fix most camera issues.
Open Get Help
If the Get Help app is unable to resolve your camera issue, do these steps first before working through the possible solutions listed:
Check for updates. Select Start > Settings > Windows Update > Check for updates.
If there are no updates for your camera, try to select Advanced options > Optional updates, and look for any driver updates for your camera. Allow available updates to install, Display Driver Uninstaller Free Activate, then restart your device when it's ready.
Restart your PC. If you haven't restarted your device since the camera stopped working, you should do so. Select Start > Power > Restart . Waking up your device from sleep isn't the same thing as a restart.
Test your camera with the Camera app. Select Start , then choose Camera from your apps. If you're asked to allow access to the Camera, select Yes. If the camera works in the Camera app, the problem might be with the app you're trying Display Driver Uninstaller Free Activate use.
Open Camera
If your camera still doesn’t work, Display Driver Uninstaller Free Activate, here are some other things to try. For the best results, try the possible fixes in the order presented.
Check for a camera switch or button on your device
Some laptops and portable devices have a physical switch or button that turns the camera on or off. When it's turned off, your device may not recognize that there's a camera installed, or it may cause your camera to show an image of a camera with a slash through it. If your laptop has a switch or button, make sure it's in the on position before using your camera.
Those switches or buttons may not be easy to find, so make sure you check all possible places. For example, it could be:
A button on the keyboard that's activated with the Fn key
A dedicated camera button on the keyboard
A sliding switch on the side of a laptop
Ispoofer 3.7.7 Crack small slider for a shutter, built right into the camera
Check your settings
Give your apps permission
If you recently updated Windows 11, you might need to give Display Driver Uninstaller Free Activate permission to use the Display Driver Uninstaller Free Activate. In newer versions of Windows 11, some apps Display Driver Uninstaller Free Activate have default access to the camera.
Here's how to let your apps access the camera:
Select Start > Settings > Privacy & security > Camera .
Allow access to the camera on this deviceMake sure Camera access is turned on.
Note: If camera access for the device is turned off and greyed out, you'll need an administrator on the device to turn on camera access for you.
Make sure Let apps access your camera is turned on.
Choose which apps should have access. Only apps that were installed from the Microsoft Store will appear in this list.
If you're having problems with an app that you did not install from Microsoft Store, make sure that Let desktop apps access your camera is turned on. You can't turn off camera access for individual desktop apps. Internet browsers, like Microsoft Edge, and many video conferencing apps, like Microsoft Teams, are desktop apps that require this setting to be turned on.
Check your antivirus software
In your antivirus software settings, look for settings that block access to your camera or permission to use your camera. For help, visit your antivirus software company’s website.
Check your hardware drivers
Try a different USB port and scan for hardware changes
If you're using an external camera, try using it with a different USB port on your device first. If that doesn't work, or your camera is built Display Driver Uninstaller Free Activate on your device, try this:
Select Start , type device manager, then select it from the search results.
Find your camera under Cameras, Imaging devices, or Sound, video and game controllers.
If you can't find your camera, select the Action menu, then select Scan for hardware changes.
Wait for it to scan and reinstall updated drivers, restart your device, then open the Camera app again to test it.
If these steps don't fix your issue, continue to the next steps.
Roll back the camera driver
If your camera stopped working after an update, try these steps:
In Device Manager, right-click (or press and hold) on your camera, then select Properties.
Select the Driver tab, select Roll Back Driver, and then choose Yes. (Some drivers don’t provide this option. If your driver doesn’t have Roll Back Driver available, go ahead to the next fix.)
After the roll back is complete, restart your device, and then try opening the Camera app again.
If rolling back didn’t work or isn’t available, continue to the next steps.
Uninstall your camera driver and scan for hardware changes
In Device Manager, right-click (or press and hold) on your camera, and then select Properties.
Select the Driver tab, then select Uninstall Device. Select the check box for Attempt to remove the driver for this device, Display Driver Uninstaller Free Activate, then select OK.
In Device Manager, on the Action menu, select Scan for hardware changes.
Wait for it to scan and reinstall updated drivers, restart your PC, and then try opening the Camera app again.
Note: If your camera still doesn’t work, Display Driver Uninstaller Free Activate, look for help on the camera manufacturer’s website.
Switch to UVC driver
Most available USB webcams are UVC Display Driver Uninstaller Free Activate USB Video Class) compatible cameras, Display Driver Uninstaller Free Activate. They will work with the UVC driver that is included in Windows (the in-box UVC driver). If your webcam is not working correctly, swapping to the in-box UVC driver may resolve the issue. Please follow the steps below to change drivers (admin rights Display Driver Uninstaller Free Activate required).
Note: The in-box UVC driver may not support all the features of your camera. For example, Windows Hello face recognition may no longer work if it was supported by the camera manufacturer's driver using custom USB extensions not supported by the in-box driver.
Select Start , type device manager, then select it from the search results.
Find the problem webcam from the list of devices shown in the Device Manager. It should appear either under Cameras or Imaging devices.
Right-click the webcam device and select Update driver.
Select Browse my computer for drivers.
Select Let me pick from a list of available drivers on my computer.
Select USB Video Device and then select Next to complete the driver update.
Select Close to acknowledge settings choices and go back to Device Manager. The webcam will now appear under the Cameras category in the Device Manager list.
Need more help?
If you'd like to learn about the basics of using the camera, Display Driver Uninstaller Free Activate, see How to use the Camera app.
Find answers in the forums
If the previous solutions didn't work, try searching for similar problems in the Microsoft Community forum and search for Camera. If you don’t find a solution, go ahead and share details about your experience there, then check back later for responses.
Submit feedback
If you've tried the steps in this article and don't find a solution that works, use Windows Feedback Hub to report an issue. This will help Microsoft find the cause Display Driver Uninstaller Free Activate this problem and improve your experience.
Include details about what you were doing, or specific steps you were taking, when the problem occurred. Be sure to use Recreate my problem when you submit your feedback in the Feedback Hub.
Open the Feedback Hub
Related topics
When your camera isn't working in Windows 10, it might be missing drivers after a recent update. It's also possible that your antivirus program is blocking the camera, your privacy settings don't allow camera access for some apps, or there's a problem with the app you want to use.
Before you begin
Start by running the automated camera troubleshooter in the Get Help app, Display Driver Uninstaller Free Activate. Get Help automatically runs diagnostics and takes the correct steps to fix most camera issues.
Open Get Help
If the Get Help app is unable to resolve your camera issue, do these steps first before working through the possible solutions listed:
Check for updates. Select Start , then select Settings > Update & Security > Windows Update > Check for updates. If you see the option to View optional updates, select it to see if there are updates available for your camera. Allow available updates to install, then restart your Display Driver Uninstaller Free Activate when it's ready.
Restart your PC. If you haven't restarted Display Driver Uninstaller Free Activate device since the camera stopped working, you should do so. Select Start , then select Power > Restart. Waking up your device from sleep isn't the same thing as a restart.
Test your camera with the Camera app. Select Start , then choose Camera from the list of apps. If you're asked to allow access to the Camera, select Yes. If the camera works in the Camera app, the problem might be with the app you're trying to use.
Open Camera
If your camera still doesn’t work, here are some other things to try. For best results, try the possible fixes in the order presented.
Check for a camera switch or button on your device
Some laptops and portable devices have a physical switch or button that turns the camera on or off. When turned off, your device won't recognize that there's a camera installed, or may cause your Display Driver Uninstaller Free Activate to show an image of a camera with a slash through it. If your computer has a switch or button, Display Driver Uninstaller Free Activate, make sure it's in the on position before using your camera.
Those switches or buttons may not be easy to find, so make sure you check all possible places. For example, it could be:
A sliding switch on the side of a laptop
A button on a keyboard with a camera icon
A small slider for a shutter, built right into the camera
Check your settings
Give your apps permission
If you recently updated Windows 10, you might need to give apps permission to use the camera. In newer versions of Windows 10, some apps don’t have default access to the camera.
To let your device access the camera, select Start , then select Settings > Privacy > Camera . In Allow access to the camera on this device, if Camera access for this device is turned off, select Change and turn on Camera access for this device.
Allow access to the camera on this device
Note: If camera access for the device is turned off and you can't select Change, you'll need an administrator on the device to turn on camera access for you.
Before any app can access your camera, make sure camera access is turned on for apps in your user account. Make sure that Allow apps to access your camera is turned on.
After allowing access to the camera, go to Choose which Microsoft Store apps can access your camera and turn on camera access for the apps you want. Only apps installed from the Microsoft Store will show in this list.
If you installed the app from the internet, a disc, a USB drive, or your IT administrator installed the app for you, it might not be a Microsoft Store app. To check, go to Allow desktop apps to access your camera and make sure it's turned on. Internet browsers (like Microsoft Edge) and many video conferencing apps (like Microsoft Teams) are desktop apps that require this setting to be turned on.
Check your antivirus software
In your antivirus software settings, look for settings that block access to your camera or permission to use your camera. For help, visit your antivirus software company’s website.
Check your hardware drivers
Try a different USB port and scan for hardware changes
If you're using an external camera, Display Driver Uninstaller Free Activate, try using it with a different USB port on your device first. If that doesn't work, or your camera is built in on your device, try this:
In Search on the taskbar, type device manager, then select it from the search results.
Find your camera under Cameras, Imaging devices, or Sound, video and game controllers.
If you can't find your camera, select the Action menu, then select Scan for hardware changes.
Wait for it to scan and reinstall updated drivers, restart your device, then try opening the Camera app again.
If these steps don't fix your issue, continue to the next steps.
Check for an incompatible camera driver
Some older cameras that were designed for older devices aren't compatible with Windows 10. Here's how to check if your camera is compatible:
In Device Manager, look for your camera under Cameras, Imaging devices, or Sound, video and game controllers.
Right-click (or press and hold) on the name of your camera, and then select Properties.
Select the Driver tab, select the Driver Details button, and look for a file name that includes stream.sys. If it’s there, your camera was designed before Windows 7 and you'll have to replace it with a newer camera.
If you don't find a file name that includes stream.sys, continue to the next steps.
Roll back the camera driver
If your camera stopped working after an update, try these steps:
In Device Manager, right-click (or press and hold) on your camera, and then select Properties.
Select the Driver tab, select Roll Back Driver, and then choose Yes. (Some drivers don’t provide this option. If your driver doesn’t have Roll Back Driver available, go ahead to the next fix.)
After the roll back is complete, restart your device, and then try opening the Camera app again.
If rolling back didn’t work or isn’t available, continue to the next steps.
Uninstall your camera driver and scan for hardware changes
In Device Manager, right-click (or press and hold) on your camera, and then select Properties.
Select the Driver Display Driver Uninstaller Free Activate, then select Uninstall Device. Select the check box for Deletethe driver software for this device, then select OK.
In Device Manager, on the Action menu, select Scan for hardware changes.
Wait for it to scan and reinstall updated drivers, restart your PC, and then try opening the Camera app again.
Note: If your camera still doesn’t work, look for help on the camera manufacturer’s website.
Switch to UVC driver
Most available USB webcams are UVC (standard USB Video Class) compatible cameras. They will work with the Display Driver Uninstaller Free Activate driver that is included in Windows (the in-box UVC driver). If your webcam is not working correctly, swapping to the in-box UVC driver may resolve the issue. Please follow the steps below to change drivers (admin rights are required).
Note: The in-box Display Driver Uninstaller Free Activate driver may not support all the features of your camera. For example, Windows Hello face recognition may no longer work if it was supported by the camera manufacturer's driver using custom USB extensions not supported by the in-box driver.
In Search on the taskbar, type device manager, then select it from the search results.
Find the problem webcam from the list of devices shown in the Device Manager. It should appear either under Cameras or Imaging devices.
Right-click the webcam device with your mouse and select Update driver.
Select Browse my computer for drivers.
Select Let me pick from a list of available drivers on my computer.
Select USB Video Device and then select Next to complete the driver update.
Select Close to acknowledge settings choices and go back to Device Manager. The webcam will now appear under the Cameras category in the Device Manager list.
Need more help?
If you'd like to learn about the basics of using the camera, see How to use the Camera app.
Find answers in the forums
If the previous solutions don’t work, Display Driver Uninstaller Free Activate, try searching for similar problems in the Microsoft Community forum and search for Camera. If you don’t find a solution, go ahead and share details about your experience there, then check Display Driver Uninstaller Free Activate later for responses.
Submit feedback
If you've tried the steps in this article and don't find a solution that works, use Windows Feedback Hub to file a bug. This helps Microsoft find the root cause of this problem.
Include details about what you were doing, or specific steps you were taking, when the problem occurred. Be sure to use Recreate my problem when you submit your feedback in the Feedback Hub.
Open the Feedback Hub
For help Display Driver Uninstaller Free Activate feedback with Feedback Hub, Display Driver Uninstaller Free Activate, see Send feedback to Microsoft with the Feedback Hub app.
Related topics
DDU (Display Driver Uninstaller) v18.0.0.4
Display Driver Uninstaller is a neat tool used to completely uninstall NVIDIA, AMD and Intel display drivers.
It accomplishes this task in only a few clicks. Sometimes it may be necessary to completely remove the display driver installed in Windows and install a clean, new version of the drivers. This tool makes the first part of the process as easy as a few clicks of the mouse.
For discussion on this tool, see this thread.
Suggest corrections
Screenshots:
HTML code for linking to this page:
Keywords:
display driver uninstaller nvidia amd intel drivers
License typeFreeware1
Author's homepageVisit the author's site
Date added29 Jul 2020
Downloads3,053
File size 1.26 MB (<1min @ 1Mbps)
Supported languages English
Operating systemsVista / Win10 / Win7 / Win8 / WinXP1
1License and operating system information is based on latest version of the software.

0 Comments